meta data for this page
UV tiling / patching
UV Tiling options allow you some extra control over the final texture coordinates on a Branch generator. Unless you are careful with the UV Mapping properties, the texture coordinatess on a branch will wrap. That is, they will go outside a 0-1 space in U, V, or both. The tiling properties allow you to chop up the geometry into 0-1 chunks, or “patches”, so that no texcoords go outside 0-1.
Tiling options
The "UV Mapping:Tiling:Style" property enables the chopping-up-geometry part to change the tiling texture coordinates into 0-1 patches.
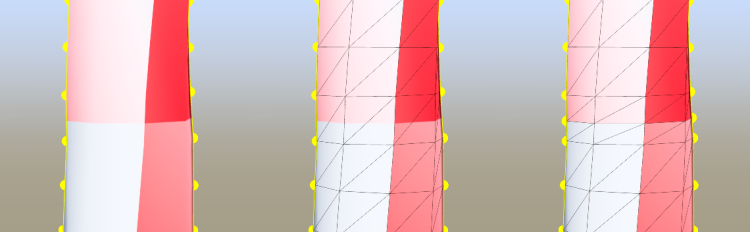
When changed from “Tiling” to one of the other options, no UV will go outside 0-1, but this may cause additional vertices to be added. With wrapping texture coordinates, the seam of the texture can fall between vertices with no problem. But this won't work when every vertex is moved within 0-1, as additional vertices will need to fall on the seam. See the picture below for an illustration of what happens when patches are enabled when the V coordinate seam does not fall on a vertex.
Note: Automatic 0-1 patches may not be worth the additional expense on very low poly game trees.
Improving texture atlases
There are some instances where just chopping up the geometry into 0-1 patches is beneficial, without any of the additional material patching changes explained below. Some applications, like Nuke, do not handle wrapping texture coordinates well, so chopping up into patches will allow it to work better.
But, one interesting effect 0-1 patches has is on texture atlassing for game trees. If your tree has many U tiles, U offsets, or twists, you may end up with a large part of your texture atlas as branches, even with “V-tiling” enabled in the Export to Game dialog. When the branch geometry is instead chopped up into 0-1 patches, a single texture tile can be added to the texture atlas for all the branches that use it. This can increase texture resolution in the final model, at the expense of a little more geometry.

Patching
Once the branch geometry has been separated into patches, there is really no need for the restriction of just one material on it. Each patch could have a different material applied. This could be an actual material or even just a part of a material. Picking/setting the materials on each 0-1 chunk of geometry will be referred to as “patching”.
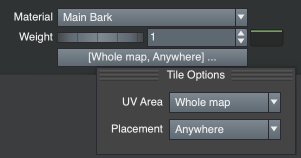
Patching has additional controls revealed when the “UV Mapping:Tiling:Style” property is switched from “Tiling”. These show up as a button in each material in the Materials property group of the branch. Clicking this button will pop the Patch Options dialog, which allows you to change the material placement or uv area for that material.
Materials
“UV Mapping:Tiling:Style” property has two options for patching. “Choose one assigned material” will pick a material similarly to the “Tiling” option, where it consults the weights of all materials set on that branch and picks one.
“Use all assigned materials”, however, will take all of the materials and distribute them on the same branch, the probability controlled by the material weight property. It is up to you to use materials that can wrap in both U and V to avoid seams. Due to the possibility of materials being different aspect ratios, when a material wins a placement, it is used for the whole ring on the branch where it applies.
Changing the patch placement from “Anywhere” to “First” will ensure a particular material is placed in the first ring on the branch. This is useful to put a different material on the base of a branch, such as a trunk with moss or lichen on it.
Finally, when in node mode, a material can be drag-and-dropped onto a specific patch. This is useful for a knothole, damage, or other such one-off material.
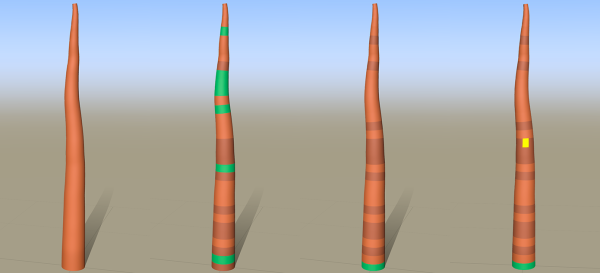
From left to right: 1) Single material chosen for all patches 2) All materials chosen at random 3) Green material set to “Start” 4) Yellow material dropped onto specific patch
UV areas
When you have an atlas with textures already in it, you need a way to specify a piece to be cut out to use. Branches are particularly troublesome for this because they usually have more than one tile in both U and V directions since branches are long and skinny. UV Areas are used for this for branches similarly how mesh cutouts are used for leaves. You can cut out a piece of an atlas to use in each patch, since you no longer need to worry about wrapping texture coordinates.
When a material has UV Areas set up on it in the Material Bar, these will show up in the corresponding setting in the Patch Options dialog in each Material property group. Once set, the rest of the patch controls work as before to control where each material is applied. And in node mode when you drop a material, it will ask which UV Area to drop on a patch.
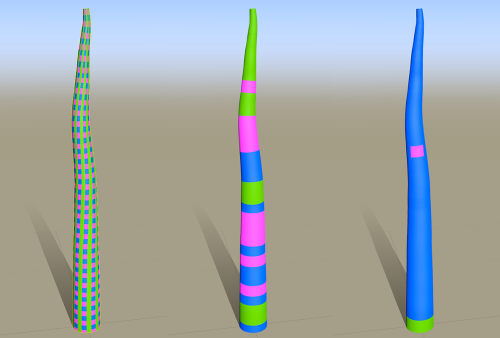
From left to right: 1) “Whole map” used on every patch 2) UV Areas used but still applied randomly 3) Intelligent mapping of UV Areas to patches