meta data for this page
Cutout Editor toolbar reference
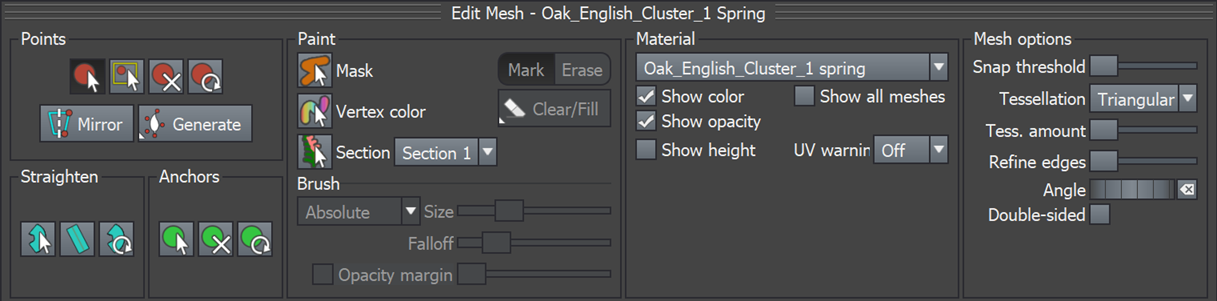
The Cutout Editor Toolbar contains all high-level controls for editing the mesh.
See Cutout Editor for more general information about this tool.
Points
The Points tools allow you to add, move, and delete vertices in the mesh. You can also generate a new mesh.
| Control | Description | |
|---|---|---|
| Add/Move | Add points by clicking in empty space. You can also move existing points by clicking/dragging them. | |
| Select/Move | Select multiple points by drawing a selection box around them. To move them, click and drag a selected point. | |
| Remove | Delete points. | |
| Reset | Clear all points. | |
| Mirror | Make the left and right side of the mesh identical. If you add a point on the right, a similar one is added on the left. Any points very close to the middle are snapped to the centerline. Deselect this property to disable the mirroring effect. | |
| Generate | Open the options to generate a new set of points. If you generate points, any existing points are removed. For the best results, use the Straighten options before you generate points. | |
| Point density | Approximate how many vertices you want in the final mesh. This is approximate, as more or fewer vertices may end up in the final mesh depending on what it had to do to generate the correct outline. | |
| Slices | Generate points in evenly spaced slices from bottom to top. | |
| Slices with center line | Generate points in evenly spaced slices from bottom to top, with an additional point in the center. | |
| Adaptive | Generate points evenly around the outside edge of the opaque parts of the current material. | |
Straighten
Straighten mode allows you to deform the texture UV space. See Straighten for more information.
| Control | Description |
|---|---|
| Straighten mode | Enable Straighten mode where instead of moving points and anchors of the mesh, you will be moving around the UV space that will be shown when switching back to any of the other tools. |
| Make linear | Force the center two points of the straighten curve to line up between the start and end points, making the straighten area a rectangle. |
| Reset | Reset the straighten area to the entire material. |
Anchors
The Anchors group allows you to add/edit mesh anchor points for where children will grow.
| Control | Description |
|---|---|
| Add/Move | Add mesh anchor points by clicking in empty space. You can also move existing points by clicking/dragging them. Each anchor point has a white line coming from it that indicates the growth direction of anything placed there. You can drag the white dot at the end of this line to set this direction. |
| Remove | Delete mesh anchor points. |
| Reset | Reset the anchors to default (none). |
Paint
The Paint group lets you paint masks, vertex colors, and separate sections onto the mesh.
| Control | Description | ||
|---|---|---|---|
| Mask | Paint a mask to remove polygons from the mesh. | ||
| Mark | Paint a mask. | ||
| Erase | Erase parts of the painted mask. | ||
| Clear | Clear all masking. | ||
| Vertex color | Paint a color onto the vertices. Choose the color from the Color Editor. | ||
| Clear | Open options to reset the colors. | ||
| Clear to black | Clear any existing colors and paint all vertices black. | ||
| Clear to white | Clear any existing colors and paint all vertices white. | ||
| Clear to current color | Clear any existing colors and paint all vertices the current color. | ||
| Section | Paint or remove sections that can be individually manipulated. This option currently only works on Frond generators. For more information, refer to Manipulate mesh sections. | ||
| New section | Add a new section. | ||
| Mark | Paint a section. | ||
| Erase | Erase parts of the section. | ||
| Clear | Open options to clear or fill the section. | ||
| Clear | Clear all markings from the current section. | ||
| Clear to marked | Fill the current section with marking. | ||
| Delete current layer | Delete the current section. | ||
| Size | Set the size of the brush. | ||
| Absolute | The brush size stays the same regardless of zoom level. | ||
| Screen | The brush size scales as you zoom in and out. | ||
| Falloff | Set the size of the falloff area on the brush. The effect gradually decreases across the falloff area. This option is not available with Mask painting. | ||
| Opacity margin | Enable this option to stay within the bounds of the material’s opacity map. Use the slider to increase the paintable area around the opacity map. | ||
Material
This option sets the material shown in the preview and affects the aspect ratio of the mesh created (to match the material). If you create a new cutout mesh by selecting the Edit button in the Materials Bar, this option will already be set to the correct value.
| Control | Description |
|---|---|
| Show color | Display the color channel from this material, possibly modulated by the opacity. |
| Show opacity | Display the opacity channel from this material, possibly modulated by the color. |
| Show height | Choosing this option will make the height map from the material show, overriding any color or opacity. |
| Show all meshes | If this material has multiple meshes assigned, this option will display them all in a different color so you can see everywhere this material is being used in meshes. |
| UV warnings | Set the threshold for warning when there aren’t enough vertices in the mesh to accurately represent the UV space deformation when Straighten is being used. The warning displays as a yellow overlay. |
Mesh options
| Control | Description | |
|---|---|---|
| Snap threshold | Control when points are automatically moved to avoid very skinny triangles in the mesh, which can cause sub-par results when the mesh is deformed with fold or curl. | |
| Tessellation | Choose the tessellation style. | |
| Triangular | Tessellate in a triangle pattern. | |
| Split | Tessellate in a triangle pattern and iteratively split the longest triangle edges to create a more regular mesh. | |
| Grid | Tessellate in a grid pattern. | |
| Tess. amount | If you wish to have more triangles in the mesh so it will work better for fold, curl, or other deformations, add them using the tessellation control. It will intelligently subdivide the existing triangles. | |
| Refine edges | Add tessellation to the outside edges of the mesh. | |
| Angle | If your texture/material isn't quite aligned with the y-axis, use this option to rotate the final mesh. The new y-axis is indicated by the orange line. You can also change the rotation angle with the Straighten tool. | |
| Double-sided | Occasionally you will want a double-sided mesh, which can often light better on things like palm fronds. This option will duplicate the mesh and flip the new one to face the other way. | |