meta data for this page
Materials Bar
The Materials Bar is where you create a material asset that can be applied to different parts of the tree. You can set textures, colors/values, and other settings pertaining to the rendering.

Managing material assets
Adding, removing, changing the name, reordering, and applying material assets to the tree is done the same way for all of the assets. This process is described in Common Asset Settings.
Settings tab
This section contains general settings for the material.
Main
Two-Sided
This option allows this material to be seen from both the front and back.
Season
When working with Seasons, the season curve controls the weight of this material depending on the season slider.
Variations
Variations allow you to randomly vary the color of a material slightly on different parts of a tree. For example, you create one leaf material, but you use variations to alter the color slightly, making it look like there are multiple kinds of leaves on the tree. Variations are very helpful when making cluster models intended for export material and used on another tree.
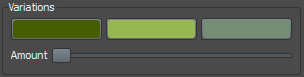
You can change your color palette by clicking on one of the three color tabs, which will open the Color Editor. You get one variation per color, plus the original texture, which makes 4 variations in total. The slider controls the intensity of the color applied per variation.
On export, a new texture is created with your variation color/amount baked in, so nothing additional needs to be done in an external app to support it.
Note: Be wary of using variations in trees intended for real-time rendering. Each variation results in an additional texture, or more space used in the texture atlas. Often using two wildly different textures has a better effect than two variations with slight color shifts.
Back
Material
This lets you set another material to be used as the “back” of this material when applicable, like on leaves.

Spacing
When a back is added to some piece of geometry, it is also a piece of geometry, just with a different material. To avoid Z-buffer problems, you can adjust the spacing between the front and back piece of geometry.
Atlas
Scale
This scale is applied to the size of this material when exporting an unwrapped mesh, exporting an atlassed tree for real-time rendering, and creating lightmapping UVs for game engines.
Handling
When an atlas is made at export time, materials that don’t have wrapping UVs are included by default. You can override the default to include or exclude a material, regardless of its texture coordinates.
| Property | Description |
|---|---|
| Default | Include the material if the texcoords are within 0–1. Otherwise exclude the material. |
| Force In | Include the material regardless of the texcoord values. Use this option to include a material even if it has wrapping UVs. Note that including these materials might negatively impact texture resolution on the final model. |
| Force Out | Exclude the material. Use this option to exclude a material from the atlas even if it has texcoord values within 0–1. |
Name
Multiple atlases can be created at export time by specifying which materials go into which atlas. You do this by setting the name of the atlas on the material. The empty default name means the usual atlas. Any other name becomes a suffix appended to the texture and material names. You can put the same atlas name into multiple materials to control exactly what goes into which atlas.
Other
Max resolution
This option can override the app-wide setting for the maximum resolution of textures uploaded to the graphics card. The “default” setting uses the app-wide setting from the preferences.
User data
This string is available through the SpeedTree SDK for specialized material data SpeedTree doesn't otherwise provide.
Make New Set
This button is a shortcut to make a new Material Set that already contains this material.
Cutouts/Meshes tab
This section allows you to set or create mesh cutouts that can be used with this material wherever it is used on the tree. There can be multiple of these, which can be picked through various means by the Generators utilizing the meshes.
To add more, click the add button. On any slots that already exist, you can choose a previously created/imported mesh asset. Clicking the Edit button is a shortcut to the Mesh Cutout Editor for either the currently selected mesh or, if no mesh is currently selected, a new cutout mesh.
Unwrap
This option controls how these separate meshes are handled when textures are atlassed. Share - One shared UV area for all the meshes is placed into one chunk/island in the atlas. Use this option if you wish to have meshes with overlapping UVs for the most optimal atlas. Separate - Each mesh is placed into its own chunk/island in the atlas. Use this option if you have a pre-made atlas and wish to carve out small pieces of it for your tree.
Atlas UVs tab
This section allows you to add and remove various UV areas cut out of a pre-existing atlas that can be used with this material wherever it is used on the tree. There can be multiple of these, which can be picked through various means by the Generators utilizing the UV areas.
To add more, click the add button. Clicking the button for an area opens the UV Area Editor for that area.
Maps
The maps of a material are the data used during rendering. This can be a color/value, a texture, or both. See the explanation of PBR Materials for what each map controls in the SpeedTree standard render mode.
For each map, you may set a color or value, depending on the map type. If you wish to use a texture, click the texture button below the map's color/value and you will be presented with the Map Editor dialog. Ticking the checkbox in the top left corner of the texture button allows you to disable the texture quickly without losing any edits you have made on the texture itself.
Note: The final map value used on the tree is the color/value multiplied by the texture. The texture button illustrates this combination, while the Map Editor only shows the texture itself.
You can view each map type on the tree itself by selecting the appropriate render mode in the Material submenu of the Render Mode menu in the Tree Window. Doing this is often very helpful to see, at a glance, if there are any problems when you have many materials in one tree.